Intro to Silhouette Studio for Beginners
Modified on Wed, 30 Aug, 2023 at 10:36 AM
In this introduction to Silhouette Studio for beginners, discover the top 10 things you should know.
Are you new to Silhouette Studio but don’t know where to begin? Then this tutorial is the perfect guide to get you started. With Silhouette Studio, you can create projects using your cutting machine. Make your own designs or use purchased files to create finished products. We are going to take you through the top 10 things beginners should know.
If you prefer a visual guide, we have an awesome video below for you to follow.
We need to make certain that we have downloaded and unzipped our purchased file before beginning.
Let’s begin with the software download.
Software Download
If your machine came with a CD containing Silhouette Studio, it may be outdated. The latest version of Silhouette Studio can easily be found on Silhouette America’s website.
There are three types of versions, the Current, Beta and Legacy.
Beta versions are best left for those who are skilled in testing programs.
We will be using the Current version. If you appear to have issues or have an older system, you can use the Legacy versions. These are the older versions of the software.
On the download page, you will see a blue Download button with a white arrow. If you click on the arrow, you can choose a system. This will start downloading the software.
To access the Legacy versions and further information, click on Learn More.

When you click on Learn More, you will be taken to a new page. Here you can see the links to Legacy and Beta versions, including System Requirements.

Feature 1 - Page Setup Menu
When you open Silhouette Studio, the Page Setup window will most likely load by default. This is the icon found on the top right side toolbar.
The Page Setup is one of the most important menus that a beginner should learn. The setup you choose will represent the mat, machine and material size that you will be using. In this menu are three icons, Page Setup, Grid Settings and Registration Marks.
Editing Settings under Page Setup
We need to change our machine type to reflect the correct mat. Once that is setup we can then size the media to what we are using. Under the Design Area Setup, click the drop down menu for Machine.
Now select your machine. We will be using the Cameo for this tutorial.
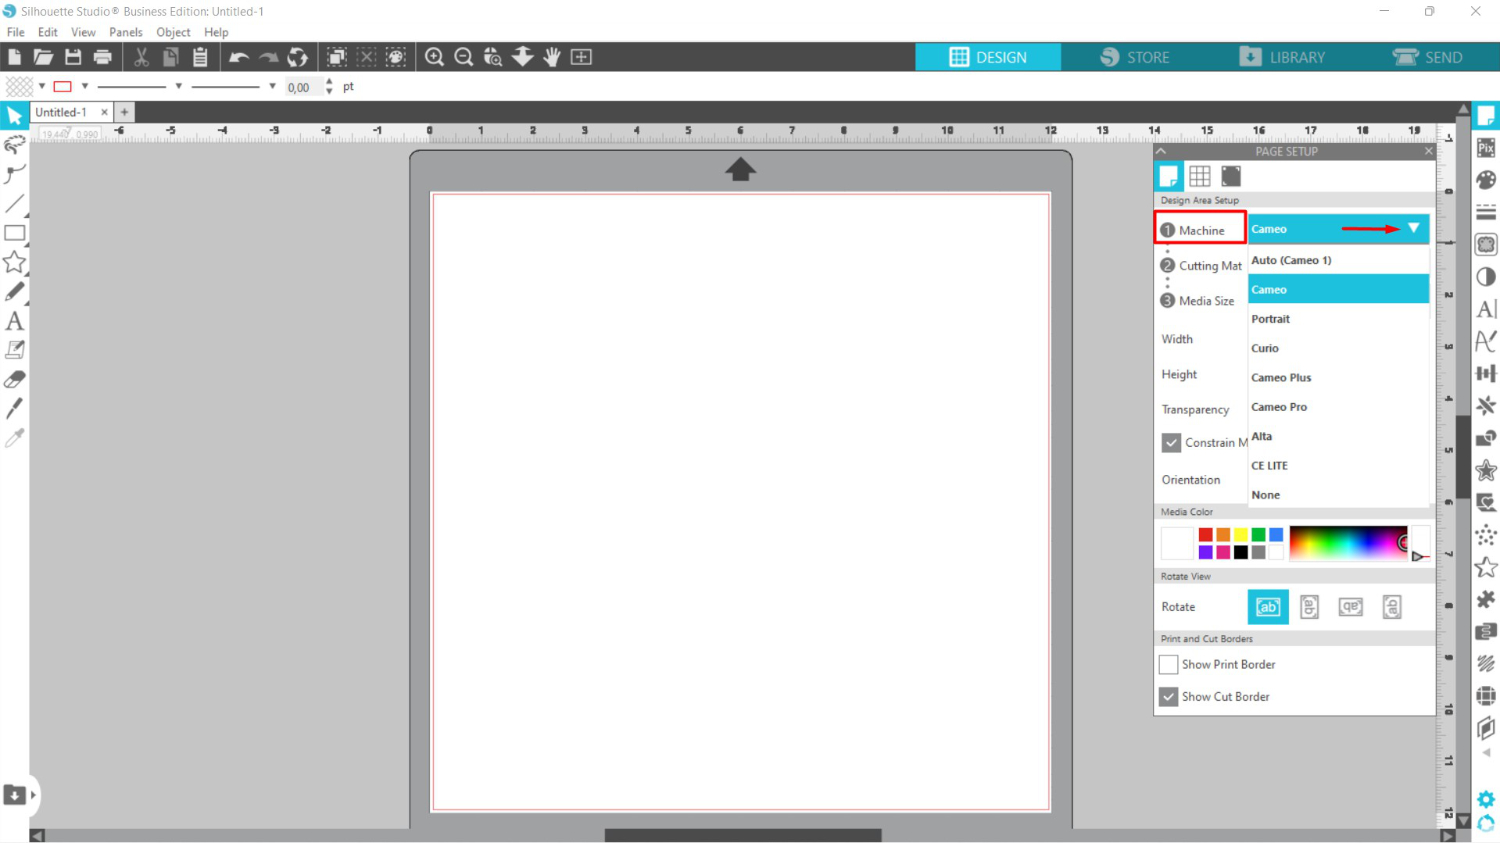
Change the Media Size
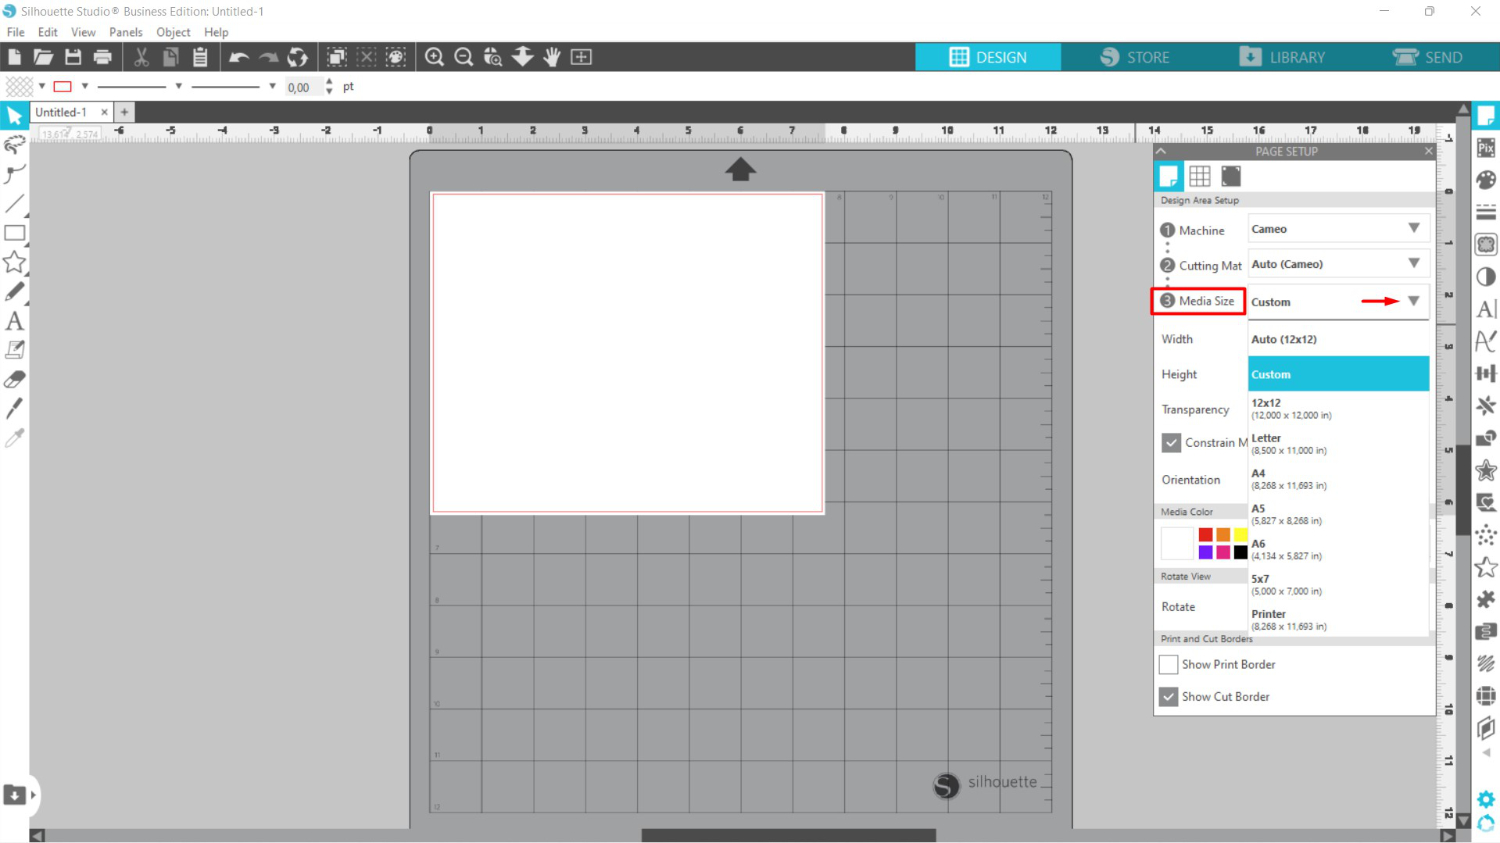
Before we change our mat in the Page Setup, let’s look at changing the Media size first. You can adjust the Width and Height to fit your specific project.
If needed, you can adjust the Transparency of your mat in case you want to see the grid lines.

You can also select from custom sizes already available. Next to Media Size, click on the drop down menu for size options.
Choose the Cutting Mat
Here you choose to cut with or without a cutting mat. If cutting without a mat, the machine will only feed in until the top of your material. If the software thinks you are cutting with a mat, an extra inch or so of the mat is fed in.
To give you a better idea, we selected the mat as None. If the software believes no mat is selected, only a small amount of material is fed in.

What happens if you want to use a mat but the Cutting Mat is set to None? Your machine will start cutting your design too high up and you will lose the top portion. So it’s always important to check your settings at the beginning.
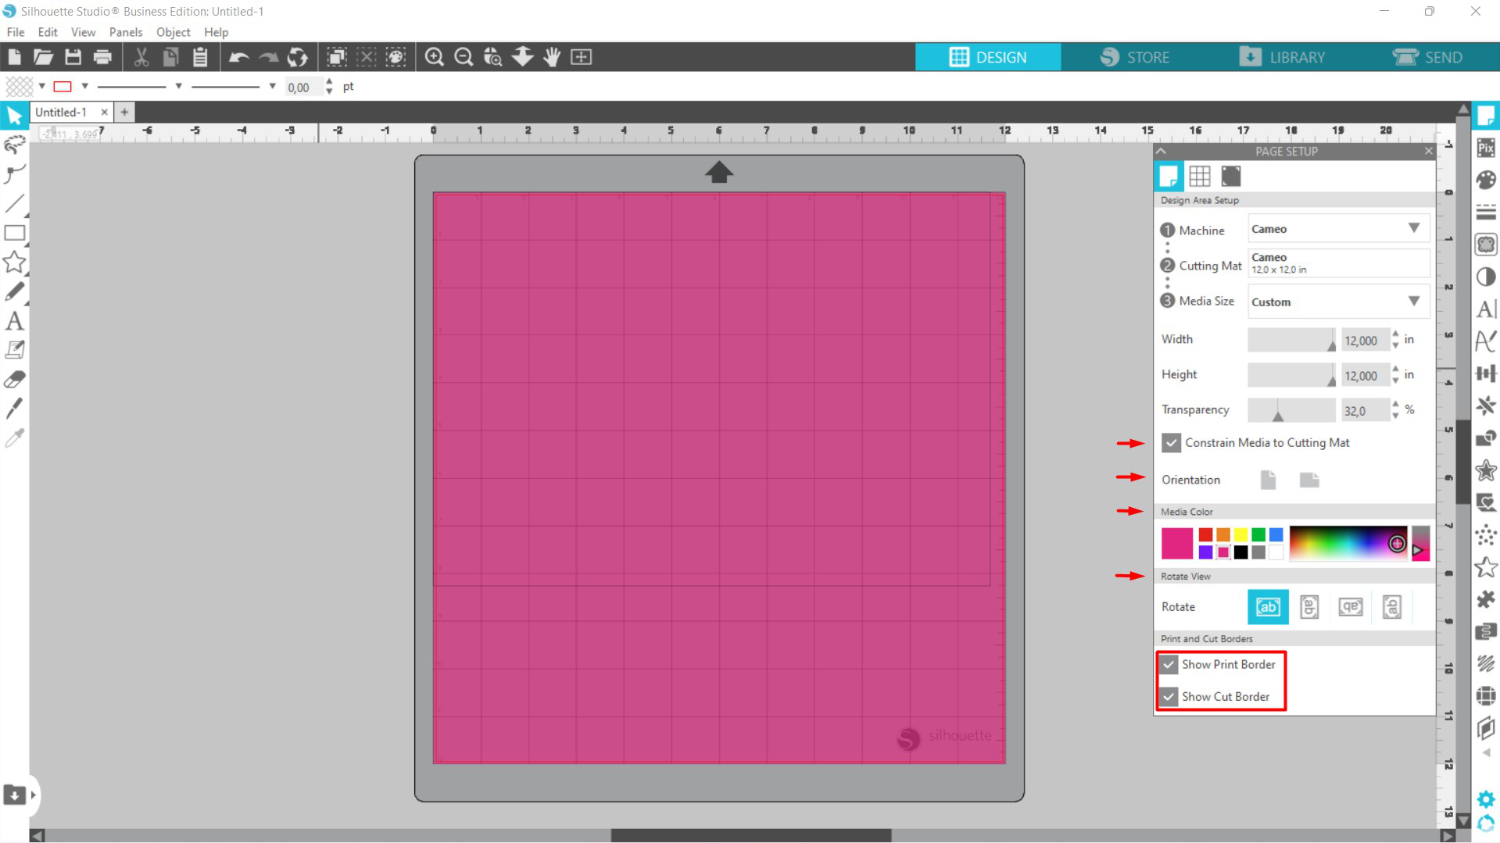
Constrain Media and Show Borders
Let’s quickly discuss the rest of the settings.
Constrain Media to Cutting Mat - the media can’t be sized larger than the selected cutting mat when this box is ticked.
Orientation - this changes the landscape or portrait position of the media
Media Color - you can now add a color to your mat to reflect the media you are using
Rotate - this will rotate the mat view, the direction of the arrow is where the mat will be fed into the machine
Show Print Border - when printing, this box should be ticked in order to see what the limits are for printing
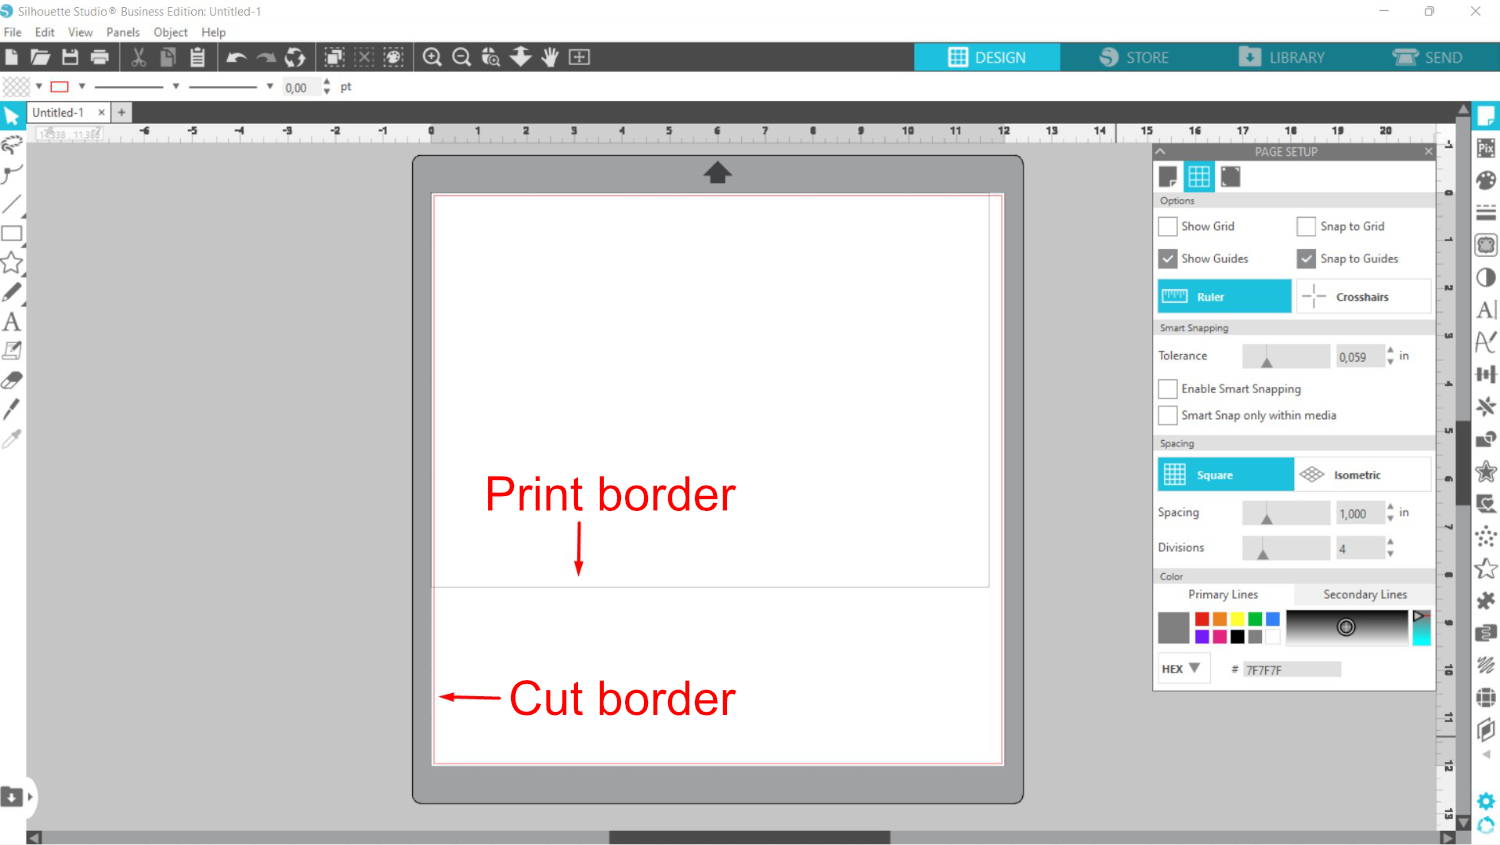
Show Cut Border - when ticked, a red line will appear indicating your cut border or the limits of where you can cut
It’s generally a good idea to tick both the Show Print Border and Show Cut Border.
Adjust the Grid Settings
Now, click on the next icon at the top for the Grid Settings.
If you have the Transparency set to 0% on Page Setup, view the grid by clicking on Show Grid. The Spacing and Divisions can also be set. As an example, if you want one inch squares, change the Spacing to 1.000 inches and the Divisions to 4.
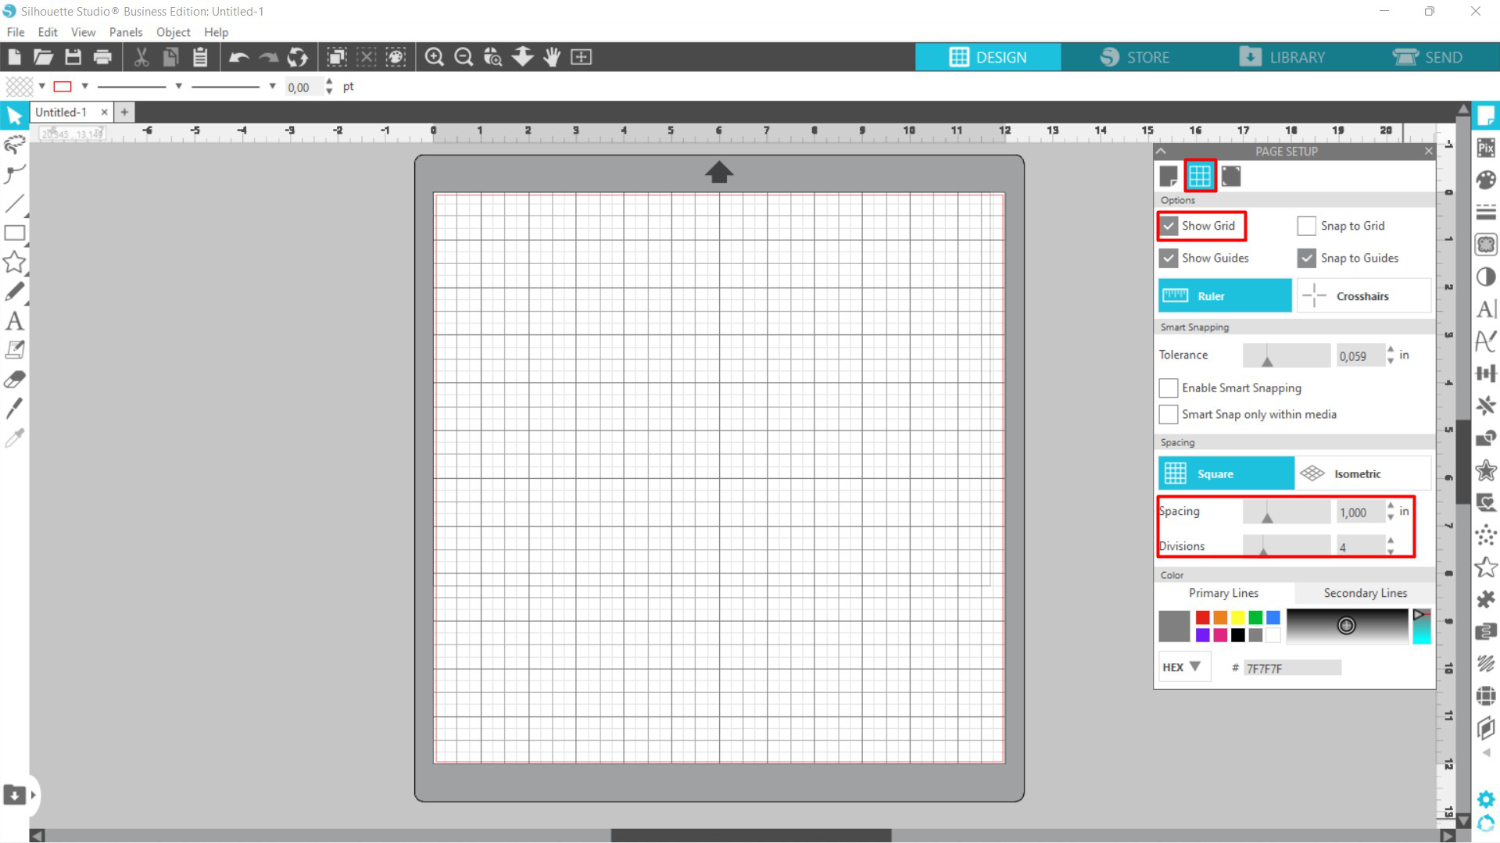
When turning off the grid, you can clearly see the Cut (red) and Print (gray) borders. These are your visual guides so you know where the cut and print areas are.
Feature 2 - Open Files in Silhouette Studio
The type of files you can open will depend on the version you have. If you are using the Free Edition of Silhouette Studio, you will be limited to Silhouette and DXF files. But not to worry. There are tons of cut files on Design Bundles that also contain DXF files.
If you want to open SVG files, you do need to upgrade to Designer Edition or higher.
Open a DXF File
DXF files have been designed for use in your Silhouette Studio. Go to File > Open and locate where your folder is stored. In the folder, look for the DXF extension. Then click OK.

Once opened, you will see two tabs on the top part of the screen. The first one is the initial project that opened when we started Silhouette Studio. The second one is the DXF file we just opened.
You can add more than one design to the same work area. You can do this two ways, use the Merge option or drag and drop. Using the Merge option is quick and easy. But if you prefer, click + drag the selected file and drop it into the work area.

You will notice that the DXF file is broken into individual parts. You may find it easier to work with if you group the elements together. To do this, select everything with the Move Tool left side toolbar. Click + drag a selection box around everything.
You can also go to Edit > Select All.
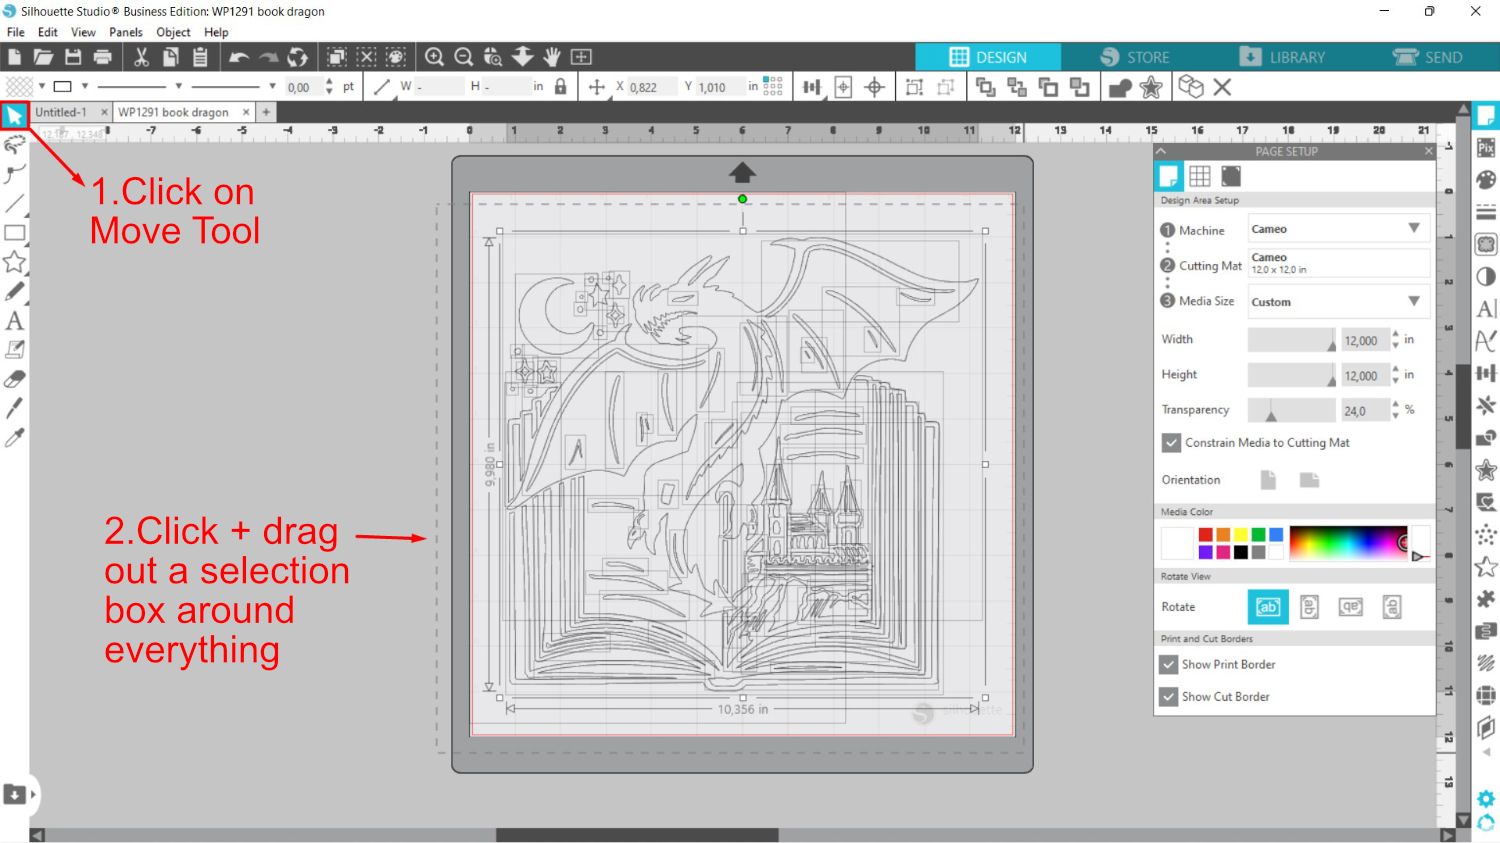
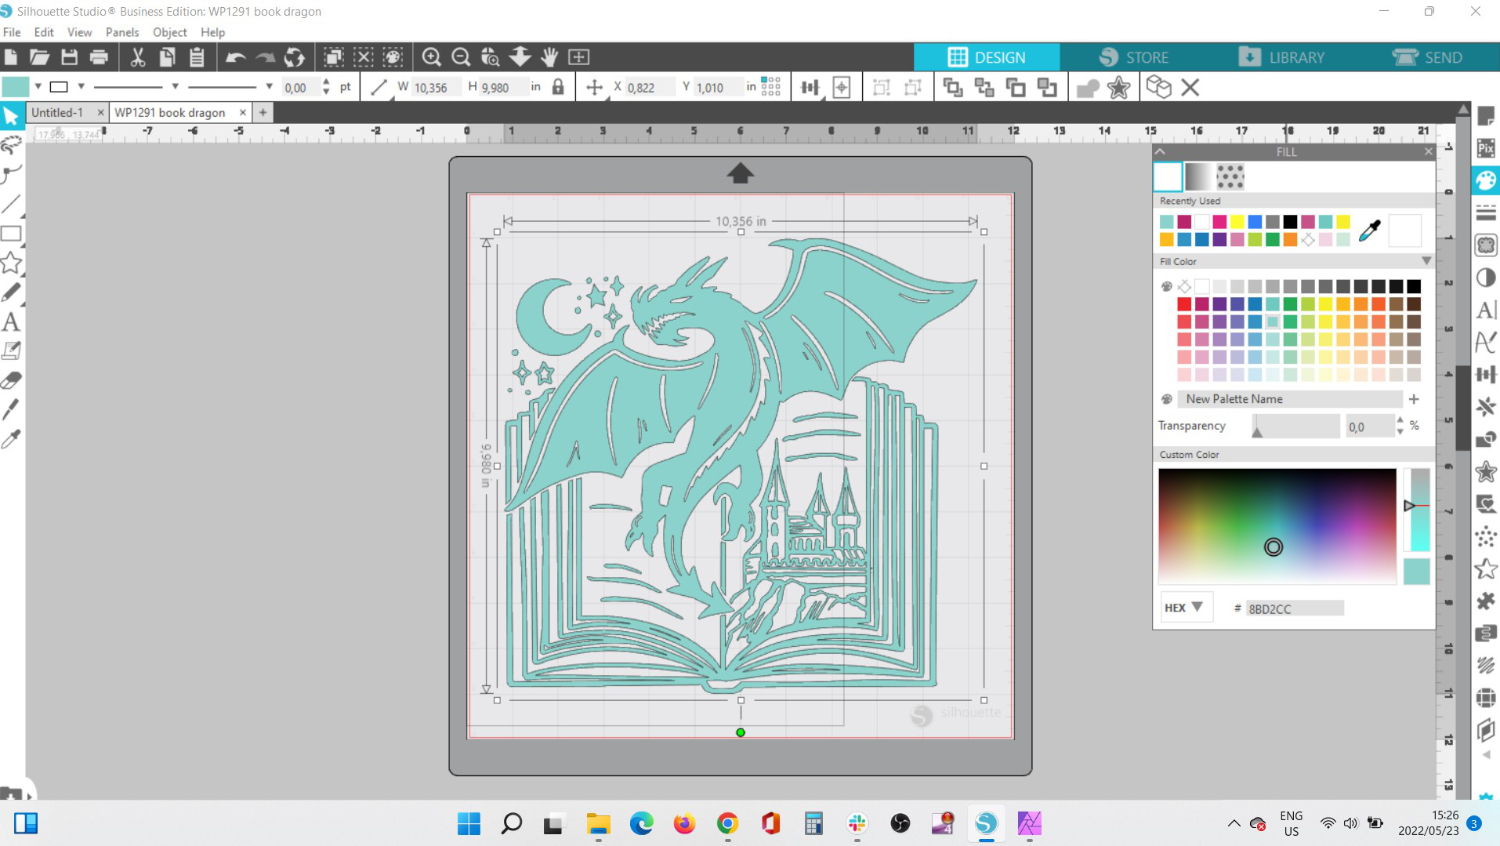
Then right click > Group. Alternatively you can also right click > Make Compound Path. We won’t go further into this but we do have a great tutorial on using compound paths in Silhouette Studio.

You can fill with color even though this won’t make a difference to the color vinyl you are using. Adding color does help to visualize the design better. If you are using this as a print and cut file, then color will matter.
We will discuss print and cut later in the tutorial.
Open a SVG File
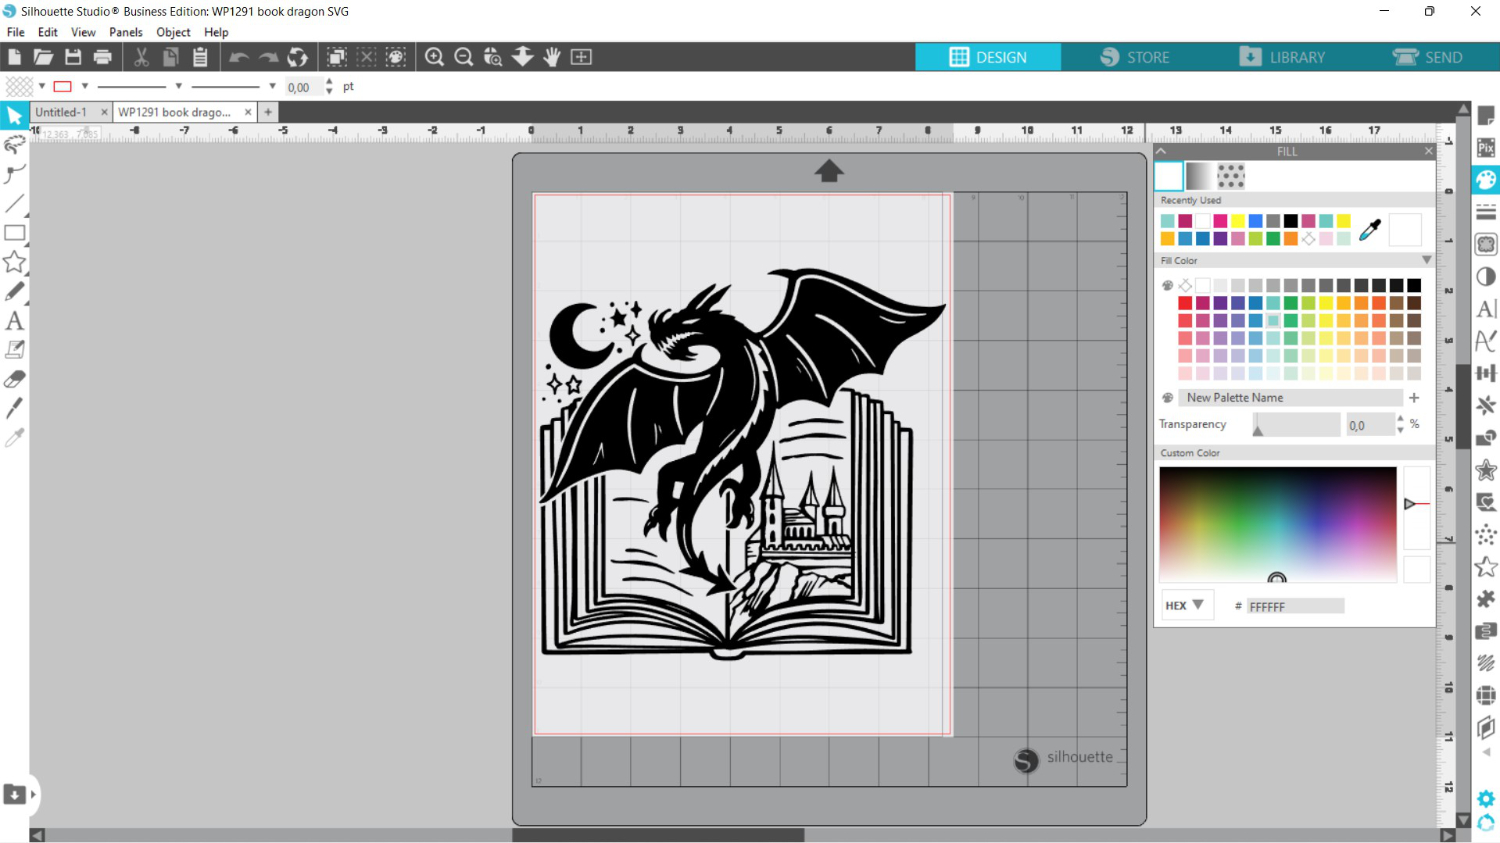
You open an SVG in the same way as the DXF. Either go to File > Open or drag and drop. Look for the SVG or Scalable Vector Graphic extension.

Once open, you can edit the file as you want. We have an awesome tutorial on using SVG files to get you started.
Feature 3 - Save your Files in Silhouette Studio
When saving your files, there are a few options. Go to File > Save As and you will see Save to Hard Drive and Save to Library.
Save to Hard Drive - this saves to your computer where you can back up to another location of your choice. You can also share the file as long it’s your design and not copyright infringement. The file is saved in an easily editable format.
Save to Library - while the library has its benefits, you are saving as one specific copy. If you want to save as another format you need to make a copy, this can fill up your system storage quickly. While designs are saved to Silhouette Cloud, it’s a good rule of thumb to save designs to another location for safe keeping.

Feature 4 - Size Designs for Projects in Silhouette Studio
A favorite project for anyone new to Silhouette Studio is creating a t-shirt design. You would need to measure out the area on the shirt to get an idea of placement and size. This is where a tape measure comes in handy.
In Silhouette Studio, you can resize the design a few ways.
Size Designs with a Shape
You can use a shape to size your design accordingly. This will help with boundaries. On the left side panel are the Drawing Tools. Click on Draw a Rectangle then click + drag a rectangle out to the side. You don’t need to worry about fill as this is just a sizing guide.

If you need to adjust the size, first select the Move Tool on the left toolbar. Then, click + drag one of the corner or side square nodes in or out. This is also how you resize designs.
Holding Shift then clicking + dragging from a corner will constrain the size.

Use the Transform Panel
Another way of resizing is to use the Transform Panel on the right side toolbar. Click on the icon to open the panel, then click on the second icon Scale.
At the bottom under Specify Dimensions, you can input the values that you want. In order to do this, you first need to click on the lock to Unlock the Aspect Ratio.
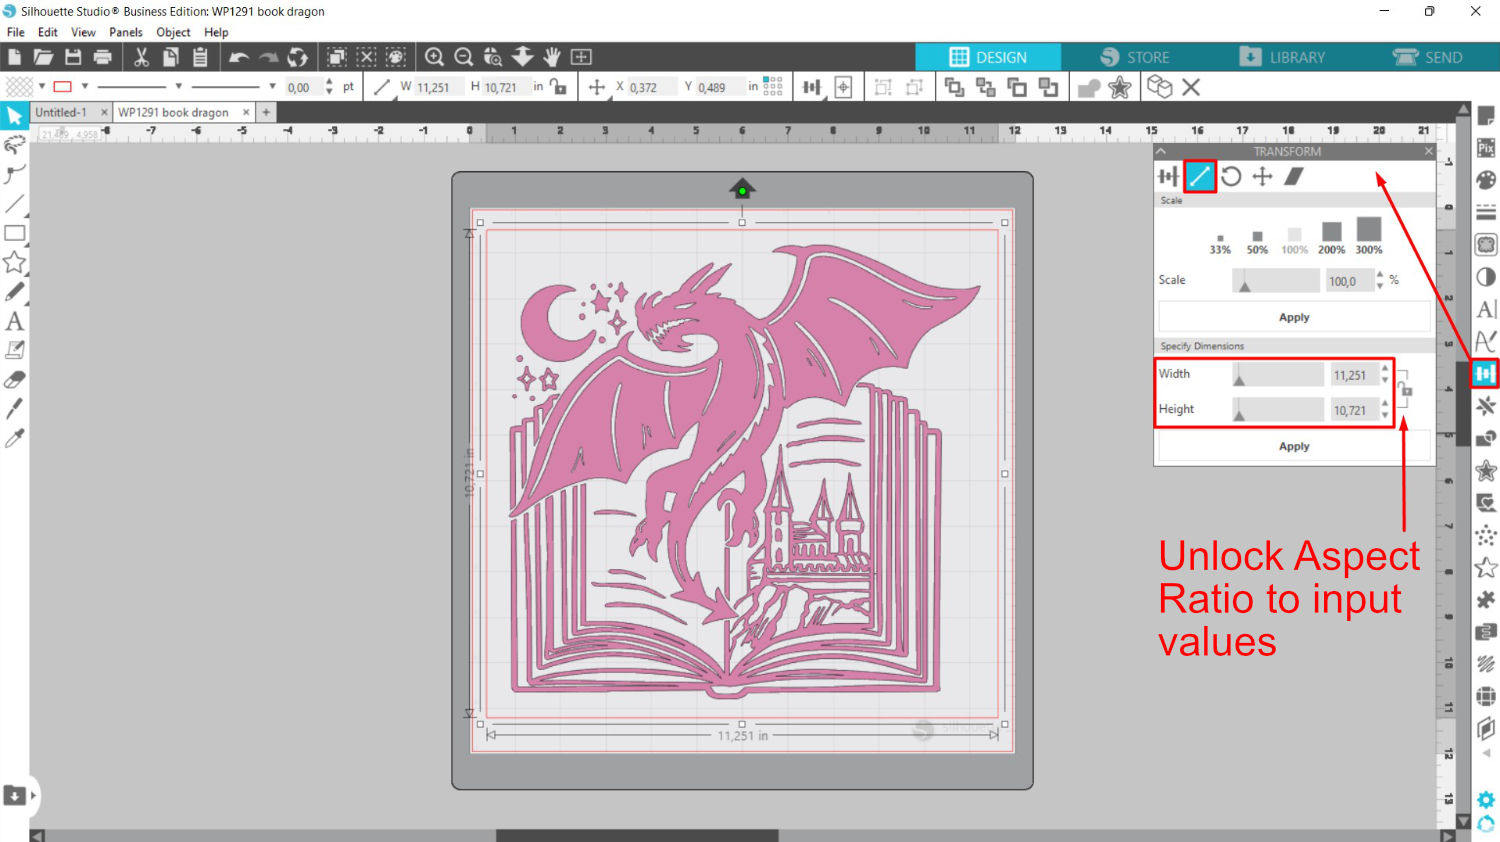
If you want to avoid distortions in images when scaling, make sure the Aspect Ratio is locked. Now, let’s talk about the Align Tool.
Feature 5 - The Align Tool in Silhouette Studio
The Align tool is one of the more important tools when it comes to positioning. This tool is also found under the Transform Panel and is the first icon in the panel.
Let’s take our dragon and rectangle as an example. We want to center them to each other. So, after selecting both, click on the Center icon that looks like a bullseye.

With both objects still selected, click on the Center to page icon. Now the design is perfectly centered throughout.

You also align to the top, middle and bottom vertically. Or, horizontally to the left, middle and right.
Feature 6 - Create a Text Object
Text can form a large part of your design. On the left side panel click on the Text Tool and create your text. All of the fonts installed on your system will be found under the Text Style Panel on the right side. Here you can change the font as well as a few other options.
We centered out text using the Center Horizontal option under the Transform Panel. You can even edit your text further if you want.
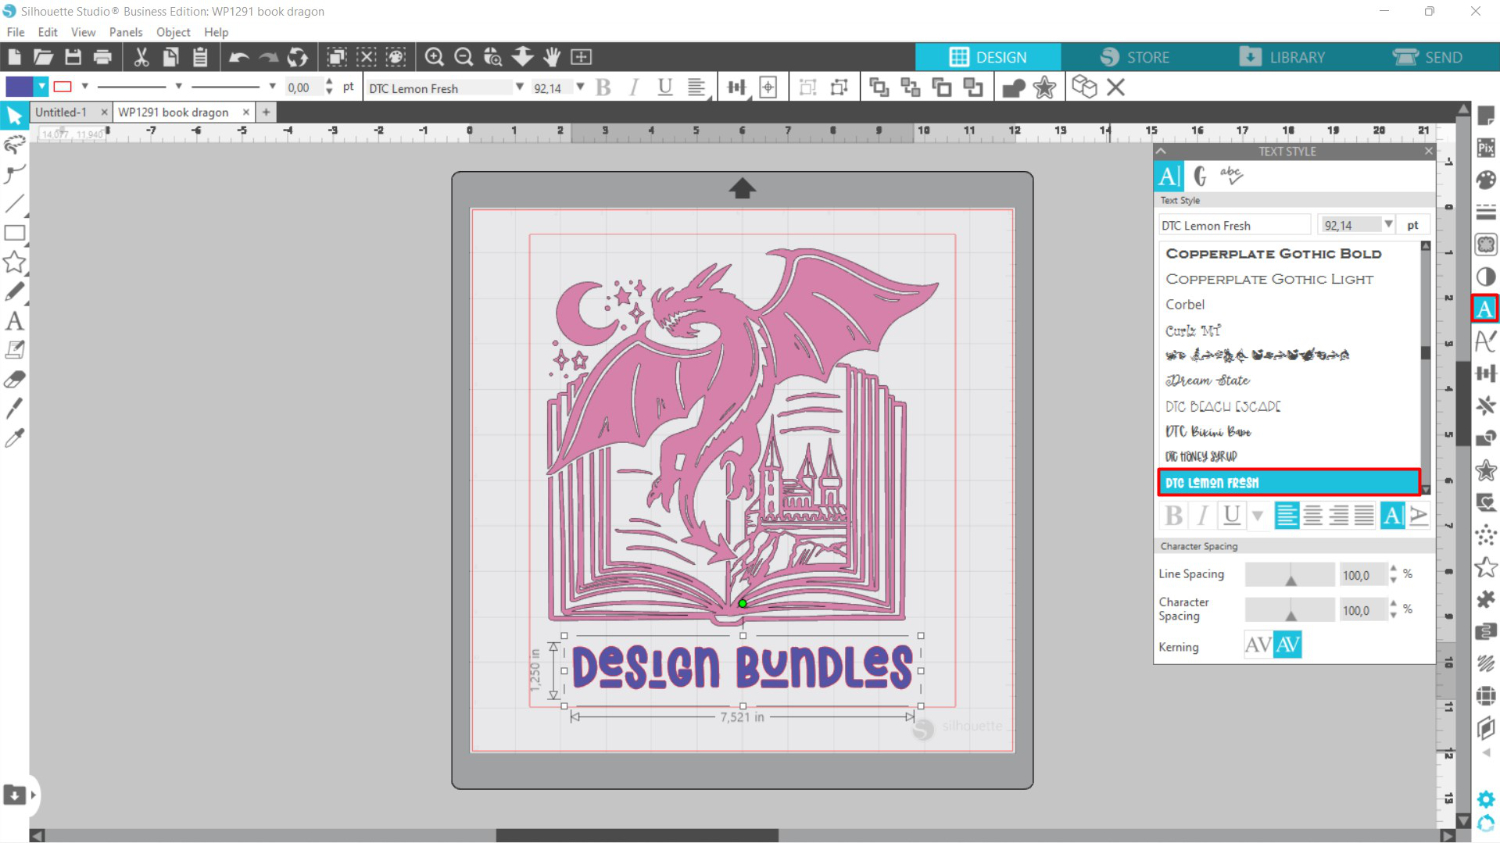
If you are using a font that overlaps, you will need to weld it. The reason we do this is because overlapping text will cause cutting issues such as independent cuts. So we fix this by right clicking > Weld. The text then becomes one solid object, which is perfect for cutting.
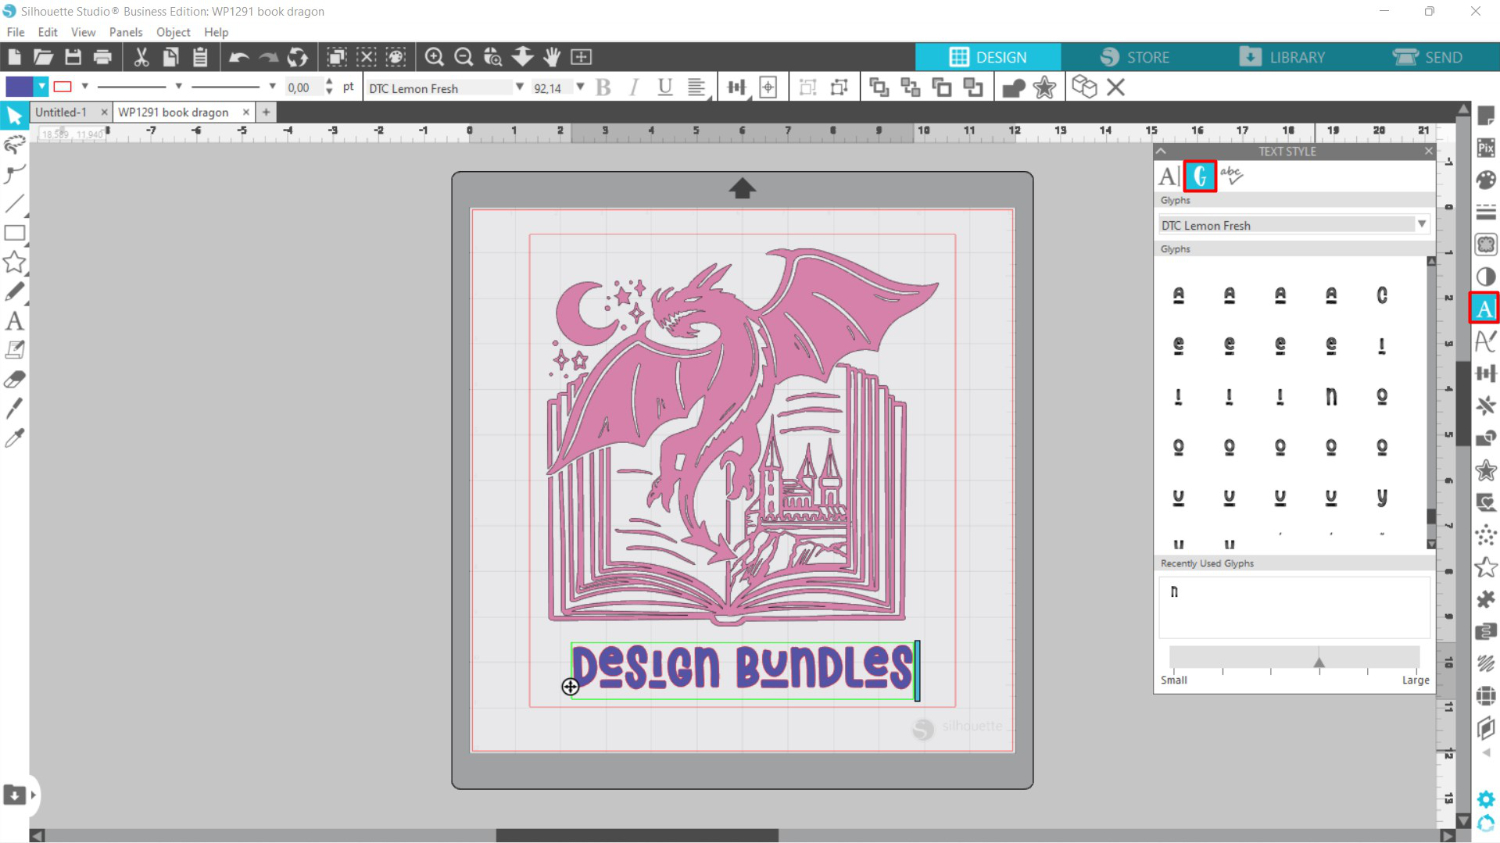
When purchasing fonts you will hear about glyphs and swashes. These are the little curls, swirls or graphics that can be added to your text. Glyphs are only available in the Designer Edition and higher.
You can find the glyphs under the second icon in the Text Style Panel.
Feature 7 - Trace Images in Silhouette Studio
Tracing is a feature that allows you to create cut lines from images. High contrast images are easier to work with but you can trace multi color images in Silhouette Studio.
The later version of Silhouette Studio automatically adds cut lines to PNG files. So, for this example, we quickly saved a JPEG version and opened it.
When we go to the Send panel and select cut, the cut lines are placed around the edge of the image. We want the cut line around the design itself. This is where the Trace Panel comes in very useful.

We selected the trace area and adjusted the threshold for clean cut lines.

Once traced and released, we deleted the JPEG. We now have clean cut lines, which you can see clearly in the Send Panel.

When using this tracing feature, be sure that it’s with a purchased design or one you have permission to use. Don’t use designs you don’t have the right to. Remember to respect the designers who work hard to create magic for you.
Design Bundles has tons of amazing designs to choose from with commercial licenses included. If you are not certain about how a design can be used, ask the designer or the team at Design Bundles. Help is always available.
Feature 8 - Use the Offset Feature
One of the really great tools in Silhouette Studio is the Offset feature. It allows you to thicken fonts, make a border for print and cut, create depth to your designs or just add impact to text. Simply put you can create a border around your design or outline.
We used the traced image of the book and butterflies. An offset with a distance of 0.400 was added. After applying the offset, you may get some gaps you don’t want.
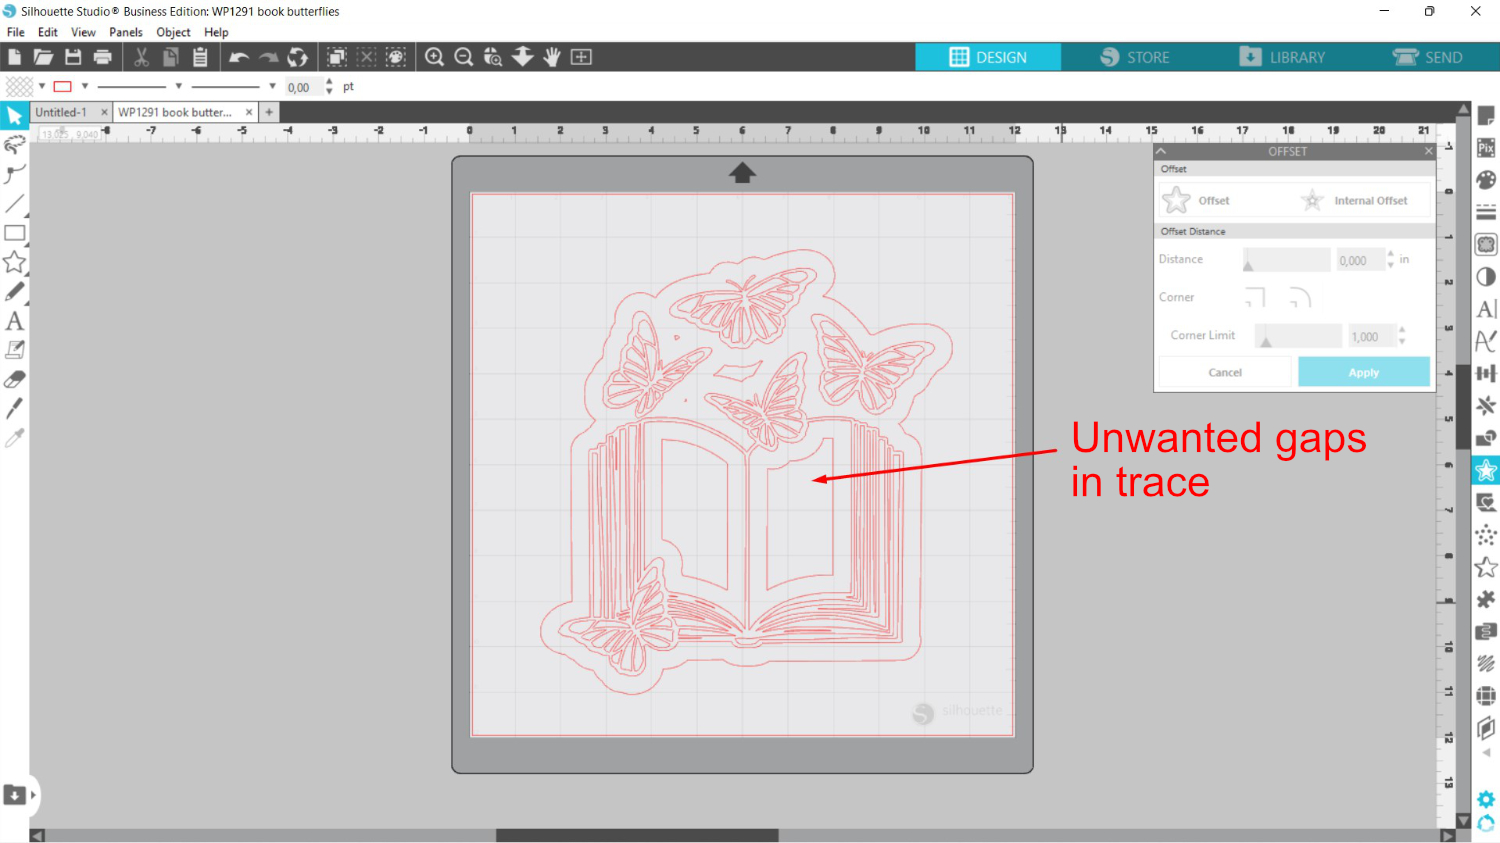
To fix this, with the offset still selected, right click > Release Compound Path. This will break the offset up into individual parts. Then, hold Shift + click on the outline of the offset. This will deselect it, so only the gaps are still selected.
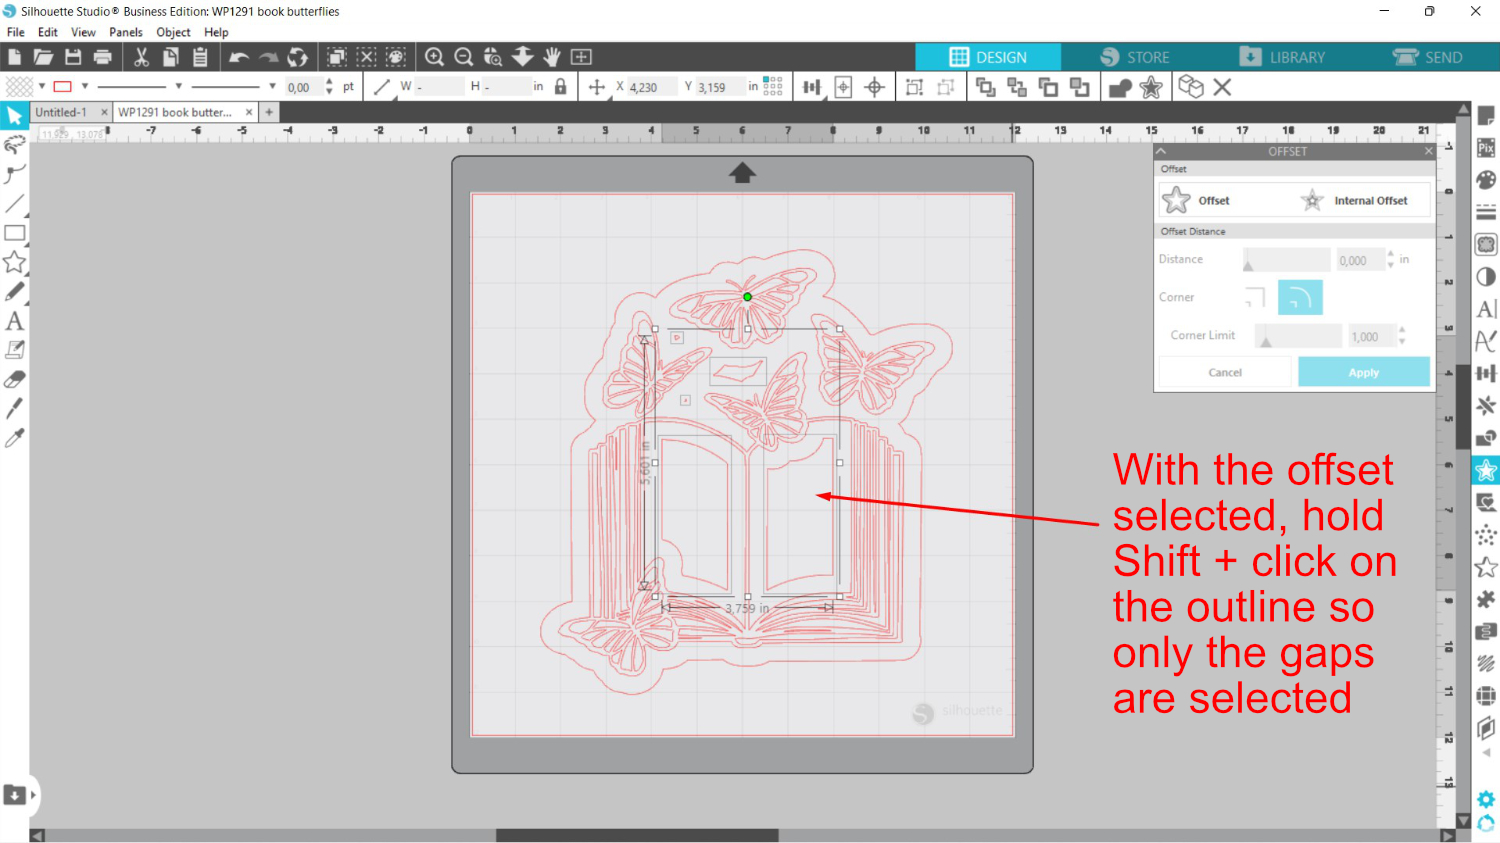
You can now hit Delete on your keyboard to remove the gaps.
Feature 9 - Print and Cut Feature in Silhouette Studio
The features that you have learned so far will lend a helpful hand when it comes to print and cut. For our example, we created a JPEG with this autism awareness png. We love the colors in this design!
Trace the Image
We will first need to trace the image. Push the Threshold to 100% so the entire design is covered in yellow. Then click on Trace.
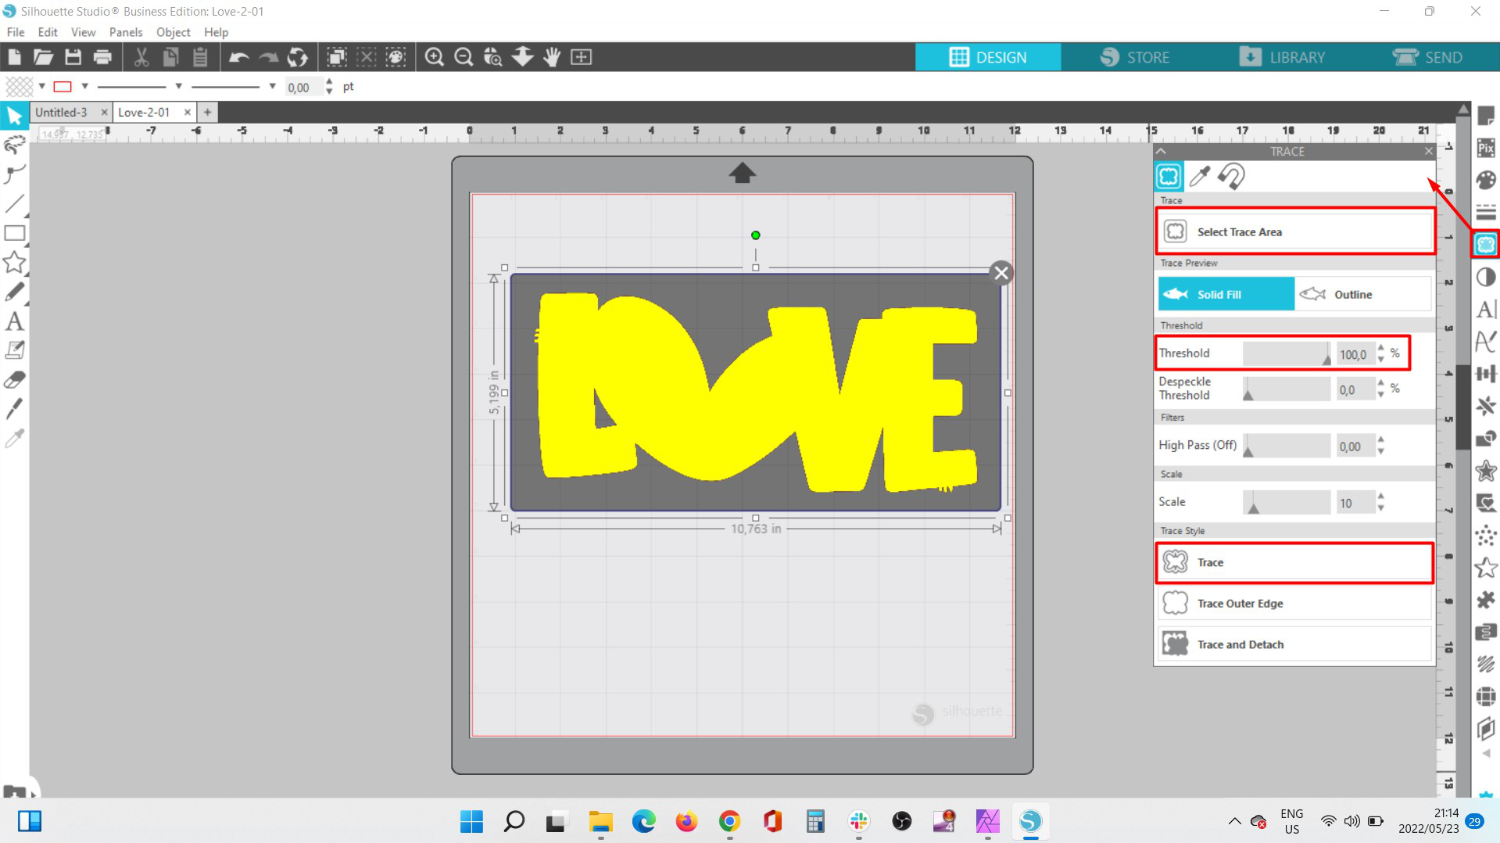
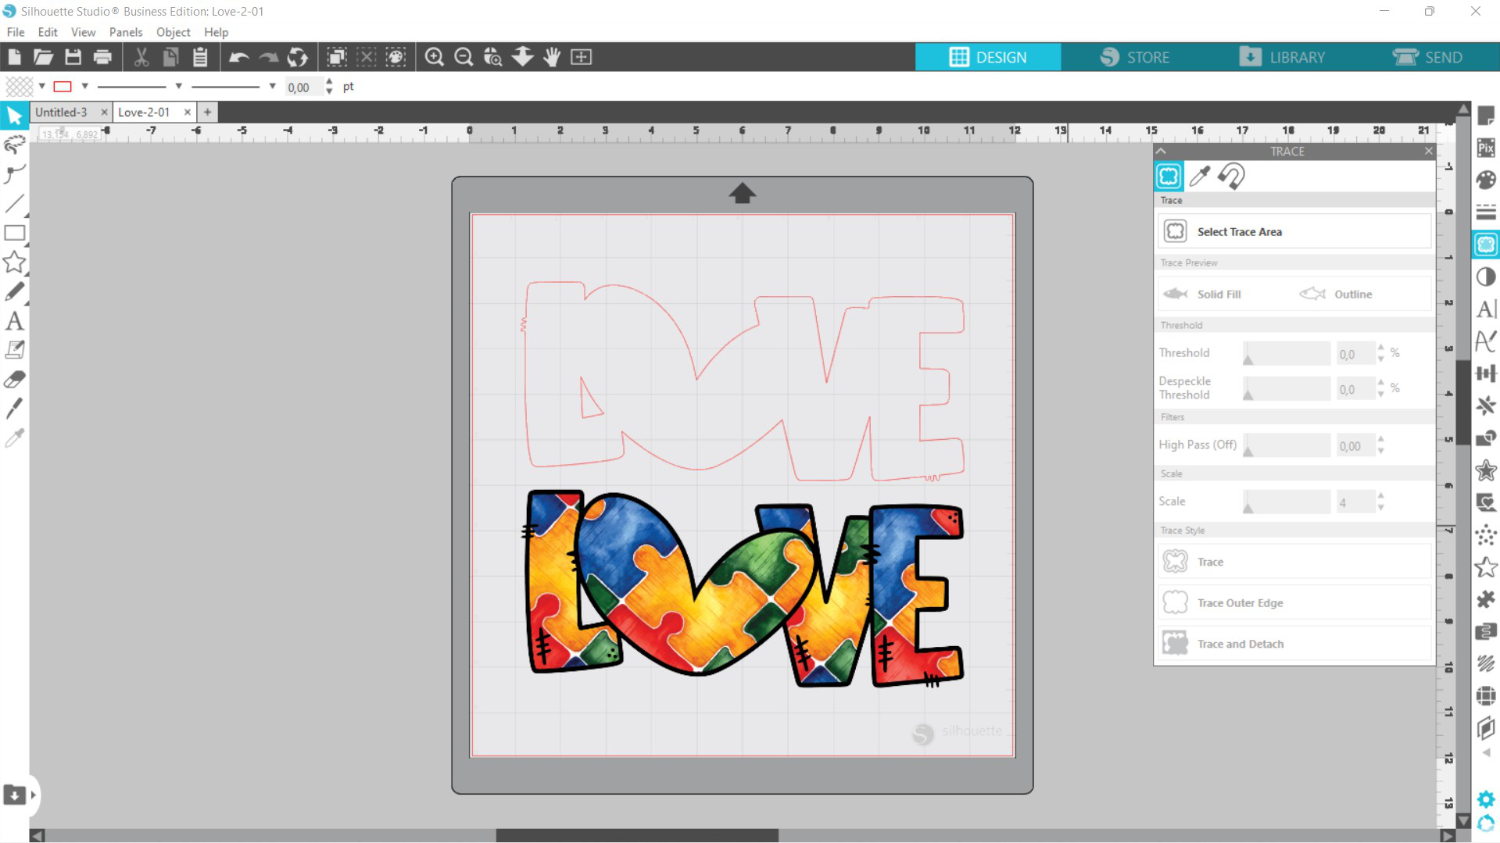
In the image below we separated the trace from the image to show you the result. You don’t need to do this. If you do, use the Transform Panel to align again.
Set Up the Registration Marks
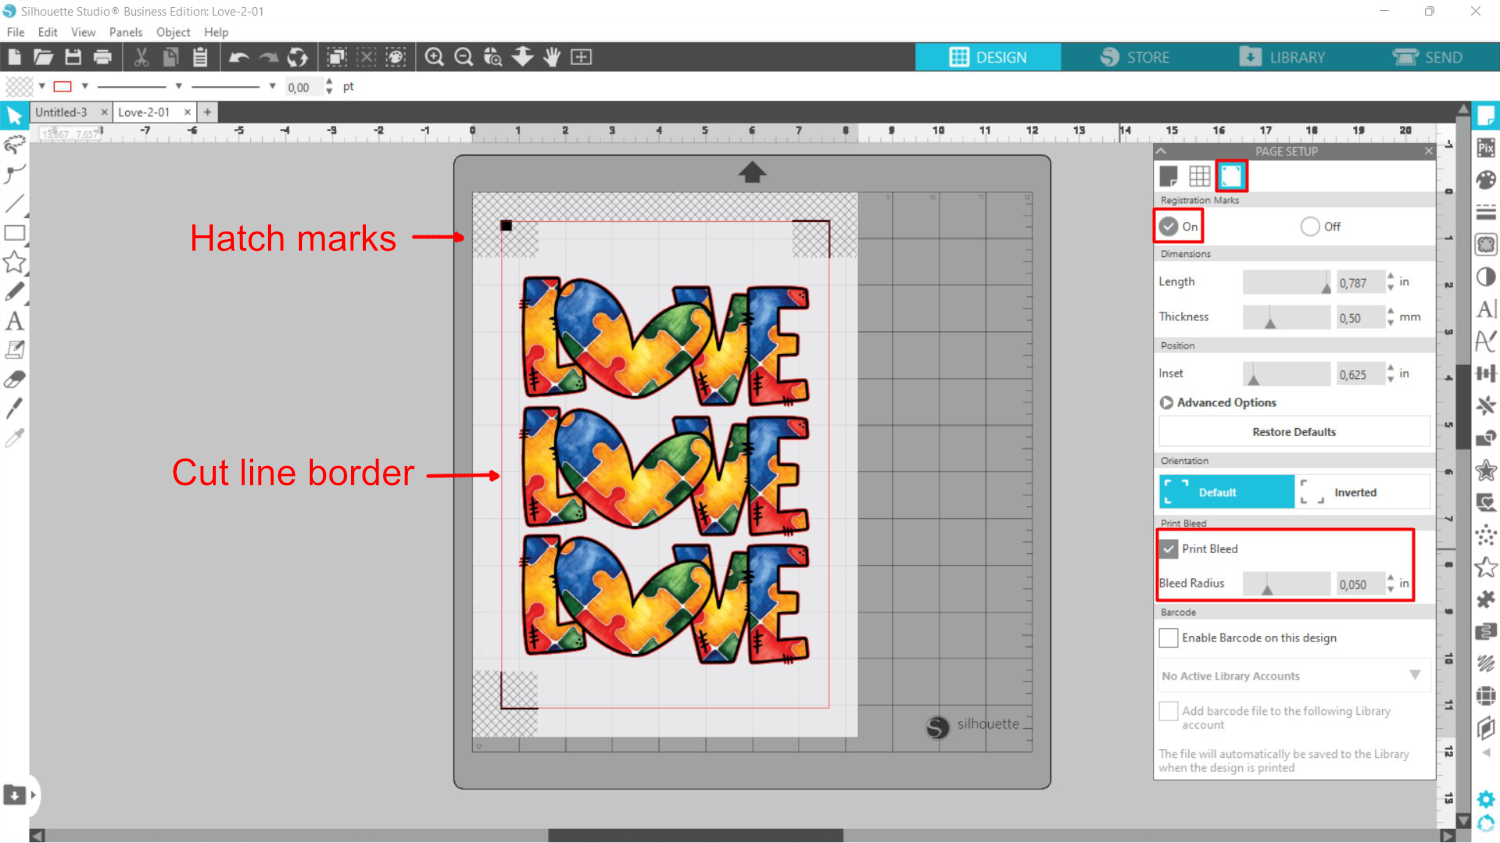
For print and cut we need to set up the registration marks so the machine knows exactly where to cut. Go to the Page Setup Panel then change the Media Size to Printer. This is usually the recommended option.
We duplicated the design two more times by right clicking > Duplicate. Next, we used the Transform Panel to align.

Click on the last icon on the top under the Page Setup Panel. Select the On option to turn the registration marks on. You can adjust the position of your design as long as it fits within the hatch borders and cut line border.
Do note that the Print Bleed option is now under the Registration Marks icon. You will want to tick this box. It creates a small area around your design that mimics the colors. If your cut is slightly off, this will avoid that annoying white border.
Print the Design and Registration Marks
The next step is to print. Before you print, make sure that your cut lines are set to 0.00 or they will print as well. Select both the designs and cut lines with the Move Tool. Now, check the top toolbar and make sure the line width is set to 0.00 pt.
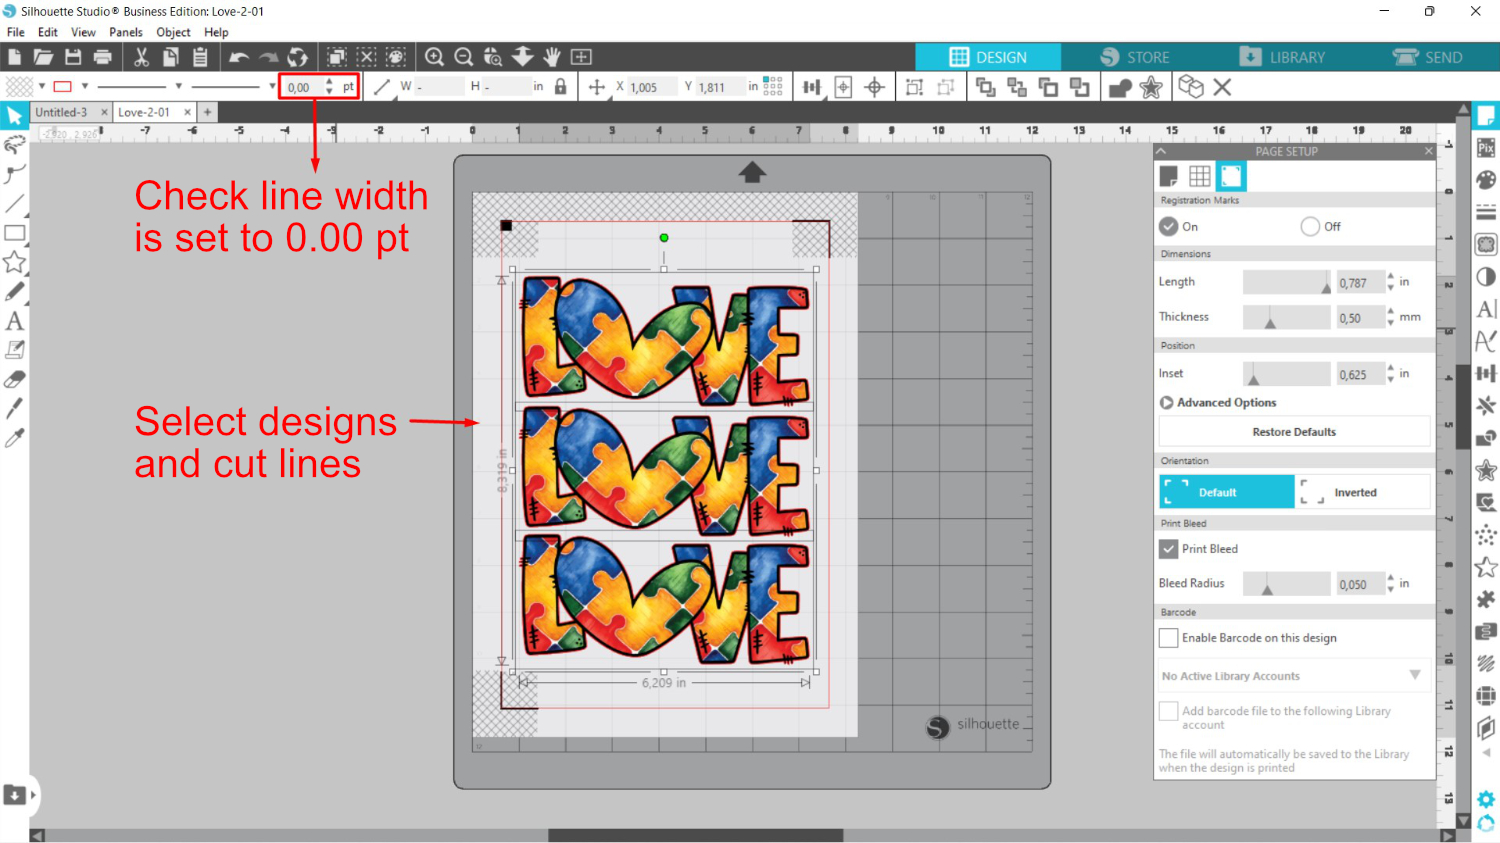
You can send to print either by clicking on the Printer icon in the top toolbar. You can also go to File > Print. Once printed, place onto your cutting mat, go to the Send Panel top right of the screen. From there you can choose your cut settings. Then, click Send to cut at the bottom of the screen.
You can also create your own cut material settings in Silhouette Studio.
Feature 10 - Software Upgrades in Silhouette Studio
The Free Edition of Silhouette Studio has a great amount of features to get you started. It is a solid program for anyone to use, whether a beginner or more advanced. The paid Designer Editions have an advantage in that they contain additional features.
You can find the comparison chart on Silhouette America’s website.
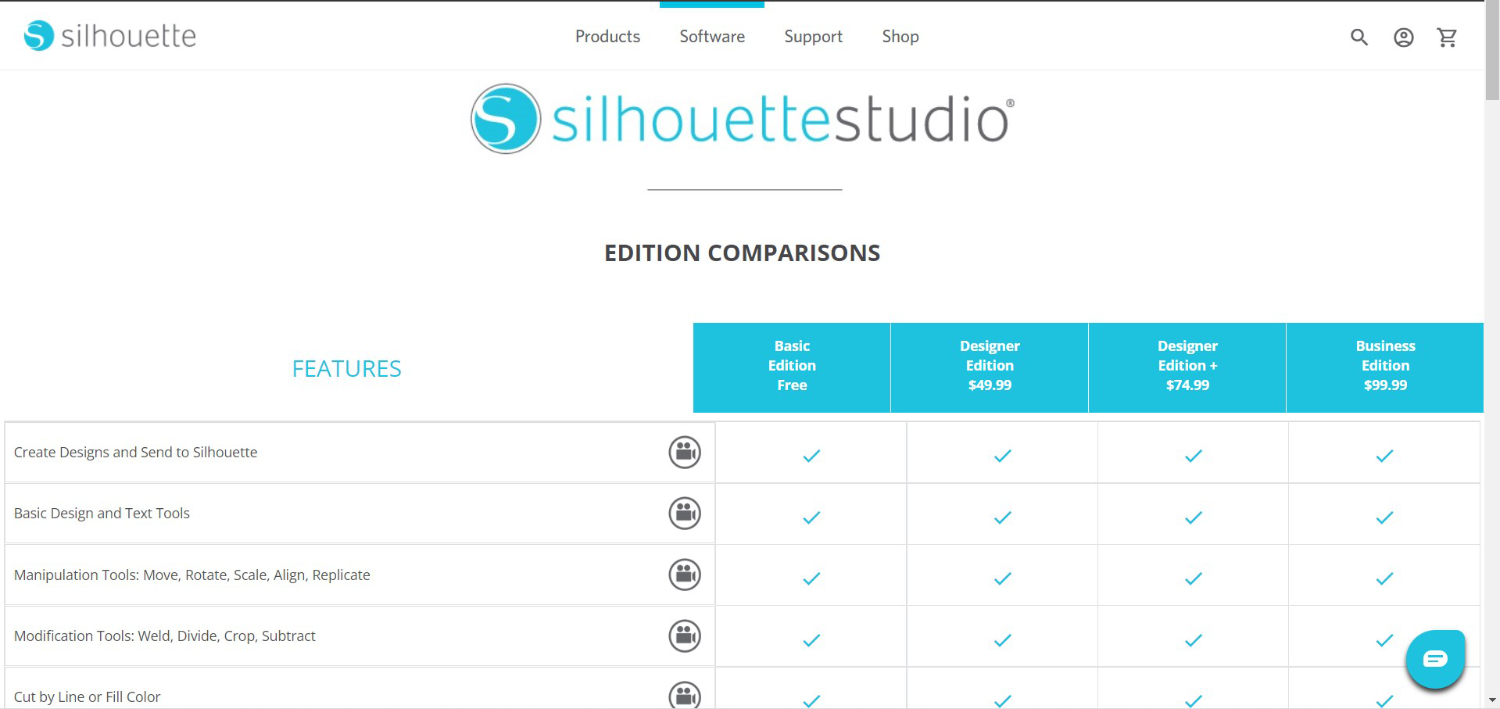
To upgrade you would need to purchase an upgrade key and activate the upgrade. Upgrades are once off and not subscription based. So once you upgrade, you’re good to go. Business Edition has all features included and is a brilliant option, especially for small businesses.
While Silhouette Studio might feel a bit daunting, once you get started, there is so much you can do. We hope that this tutorial has provided some insight into this amazing software. The more you experiment, the more you will learn and create.
Was this article helpful?
That’s Great!
Thank you for your feedback
Sorry! We couldn't be helpful
Thank you for your feedback
Feedback sent
We appreciate your effort and will try to fix the article